Development Guide
Learn all about how to make changes to OpenDevStack in your organisation and how to contribute those changes back upstream.
This guides assumes you have followed the getting-started guide, and have cloned the ODS repositories to your local Bitbucket instance.
For the rest of this guide, we will use "ACME" as the organisation name, which you will need to replace appropriately.
How to make changes to OpenDevStack
Say you have encountered a bug, or want to develop a new feature. The first step is to implement the changes, and then try them out in your OpenDevStack instance. Those changes can then be contributed back (as described in the next section) unless they are specific to your organisation.
To start, clone the repository where you want to make changes from your
Bitbucket instance. The resulting repository will have its remote origin set
to Bitbucket.
Next, you need to create a new branch where changes can be made. This branch
must be based on a clean state. This can either be the master branch (if you
are tracking bleeding edge) or, more typically, a release branch (such as
2.x). Which one to use depends entirely on your organisation: it must be the
branch on which the production branch in Bitbucket is based on. For example,
if your OpenDevStack instance is based on 2.x, then you can create a new
branch like this:
# Ensure you have the latest refs
git fetch
# Create a branch based on 2.x - flag with bug / feature, e.g bug/fix-typo
git checkout --no-track -b bug/fix-typo origin/2.x
Once you have committed the desired changes, push your branch to Bitbucket:
git push origin bug/fix-typoAfterwards, open a pull request. It is important that the target of the pull
request is the production branch. That way, you do not pollute the ODS base
branch (2.x) with changes. The production branch exists only in your
Bitbucket instance, and it is the branch that e.g. OpenShift points to, and
consequently is the branch where all your changes should end up in.
When your changes have been tested and approved, you can merge the pull request in Bitbucket. At this stage, you are ready to push your work upstream as well - continue with the next section if you want to do this.
How to contribute changes upstream
As your base branch (i.e. master) is never polluted with local changes, every branch created
from it is guaranteed to not contain any local changes, or changes to your
OpenDevStack instance that you do not want to share publicly.
To contribute your work, first you need to have a space in GitHub where you have
permissions to push your changes to. Typically, this is a fork of the repository
owned by github.com/opendevstack, located at the GitHub account of your
organisation (e.g. github.com/acme). If this fork does not exist yet, create
it on GitHub using the fork feature.
Next, you will need to push your branch to that repository fork. Before you are able to do that, you need to add the fork as a new remote to your repository:
git remote add acme https://github.com/acme/<REPO_NAME>.gitAfter that, you can push your changes there:
git push acme bug/fix-typoOnce pushed, GitHub suggests to open a pull request, and automatically sets the
master branch of the repository owned by OpenDevStack as a target. This is
usually what you want, but there might be cases where your fix is relevant only to a
certain release branch of OpenDevStack, in which case you need to change the
target to that branch. Note that if you have implemented a feature, it always
has to target master. That means that if you did not base your branch on
latest master originally, and your pull request shows a merge conflict, you
need to cherry-pick (and adapt) your changes to a branch based on latest master
in order to have it merged.
In general, to get your changes approved by core members of OpenDevStack, please ensure the following:
-
Before you make a bigger change, open a ticket first and discuss what you want to do before you actually do it. E.g. explain why this change is necessary / benefitial.
-
Ensure to follow the guide above - branches containing unrelated commits or features targeting release branches etc. will not be approved.
-
Adhere to the relevant coding standard:
-
Java files must be in Google Java Style, ensured by google-java-format-1.6-all-deps.jar.
-
Go files must be gofmt’d.
-
Groovy files should follow the Apache Groovy Style guide.
-
-
End all files with a newline character. See the POSIX definition of a line.
-
Add a changelog entry, linking to your pull request.
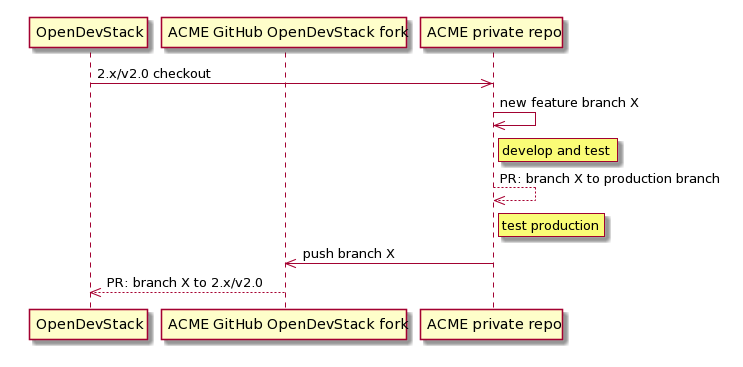
OpenDevStack branching flow for contributions
Next sequence diagram provides a graphical understanding on the steps to follow in order to add a new functionality to the OpenDevStack official repository from ACME’s private fork. The example is based on the assumption you want to contribute with a new feature from branch 2.x or tag v2.0